[Android] AndroidX의 FragmentFactory 사용하기
Fragment는 액티비티 위에서 부분 화면을 구현할 수 있게 해준다. 안드로이드 앱을 만들 때 정말 흔하게 쓰이는 요소 중 하다나. Fragment를 생성하는 가장 간단한 방법은 다음과 같다.
val newFragment = MyFragment()Fragment를 생성하는 쪽에서 특정한 데이터를 넘겨줘야 하는 경우가 종종 있는데, 이럴땐 어떻게 해야할까?
val index = 1
val newFragment = MyFragment(index)
이렇게 생성자로 바로 넘겨주는 방법을 썼다가 앱이 강제종료 되는 현상을 나를 포함해 많은 사람들이 한번쯤은 겪어보지 않았을까 싶다. Fragment의 공식 문서를 확인하면 가장 위쪽에 생성자를 만들때 알아야 하는 주의 사항이 적혀있다.
All subclasses of Fragment must include a public no-argument constructor. The framework will often re-instantiate a fragment class when needed, in particular during state restore, and needs to be able to find this constructor to instantiate it. If the no-argument constructor is not available, a runtime exception will occur in some cases during state restore.
Fragment를 상속받을 땐 인자가 없는 기본 생성자를 반드시 포함해야 한다는 내용이다. Fragment는 자신만의 lifecycle를 가지고 있지만, 이는 Fragment를 호스팅하는 Activity의 lifecycle에 종속적이다. 따라서 메모리가 부족하다거나 회면이 회전되는 등의 이벤트로 Activity가 재생성 될 때 Fragment도 함께 재생성이 된다. 이때 호출되는 함수 instantiate()는 인자가 없는 기본 생성자로 Fragment를 생성하게 된다.

오버로딩 된 생성자가 항상 호출된다는 보장이 없기 때문에 Fragment의 생성자로 데이터를 넘겼다면, 앱이 종종 강제종료되는 현상이 발생하게 된다. 따라서 Fragment로 특정한 데이터를 전달해야 할 땐, Bundle과 팩토리 메서드 패턴(Factory method pattern)이라는 디자인 패턴이 주로 사용된다.
사용하는 방법
class DetailsFragment : Fragment() {

    // ...

    override fun onViewCreated(view: View, savedInstanceState: Bundle?) {
        val index = arguments?.getInt(KEY_INDEX, 0) ?: 0
    }

    companion object {
        private const val KEY_INDEX = "index"

        /**
         * Create a new instance of DetailsFragment, initialized to
         * show the text at 'index'.
         */
        fun newInstance(index: Int): DetailsFragment {
            val f = DetailsFragment()

            // Supply index input as an argument.
            val args = Bundle()
            args.putInt(KEY_INDEX, index)
            f.arguments = args

            return f
        }
    }
}- Fragment 내부에
newInstance()같은 이름의 static 메서드를 하나 만들고, 빈 생성자로 Fragment 인스턴스를 생성한다. - key-value 형식으로 Bundle에 데이터를 저장한다.
- setArguments로 Fragment에 전달할 데이터를 설정한다.
- Fragment에선 다시 getArguments() 메서드로 전달된 데이터를 꺼내서 사용할 수 있게된다.
그러면 Activity에서는 아래와 같은 형식으로 Fragment 객체를 생성할 수 있게 된다.
val index = 1
val newFragment = DetailsFragment.newInstance(index)
이렇게 newInstance()를 만드는 것이 Fragment를 생성하는 가장 보편적인 방법이 아닐까 싶다.
이 경우 모든 fragment마다 인스턴스를 반환하는 메서드를 만들고, bundle로 데이터를 넣었다 꺼냈다 하는 처리가 필요했다.
FragmentFactory
드디어 본론인데, AndroidX부터는 FragmentFactory를 사용하면 Fragment를 선언할 때 인자가 있는 생성자를 사용할 수 있다.
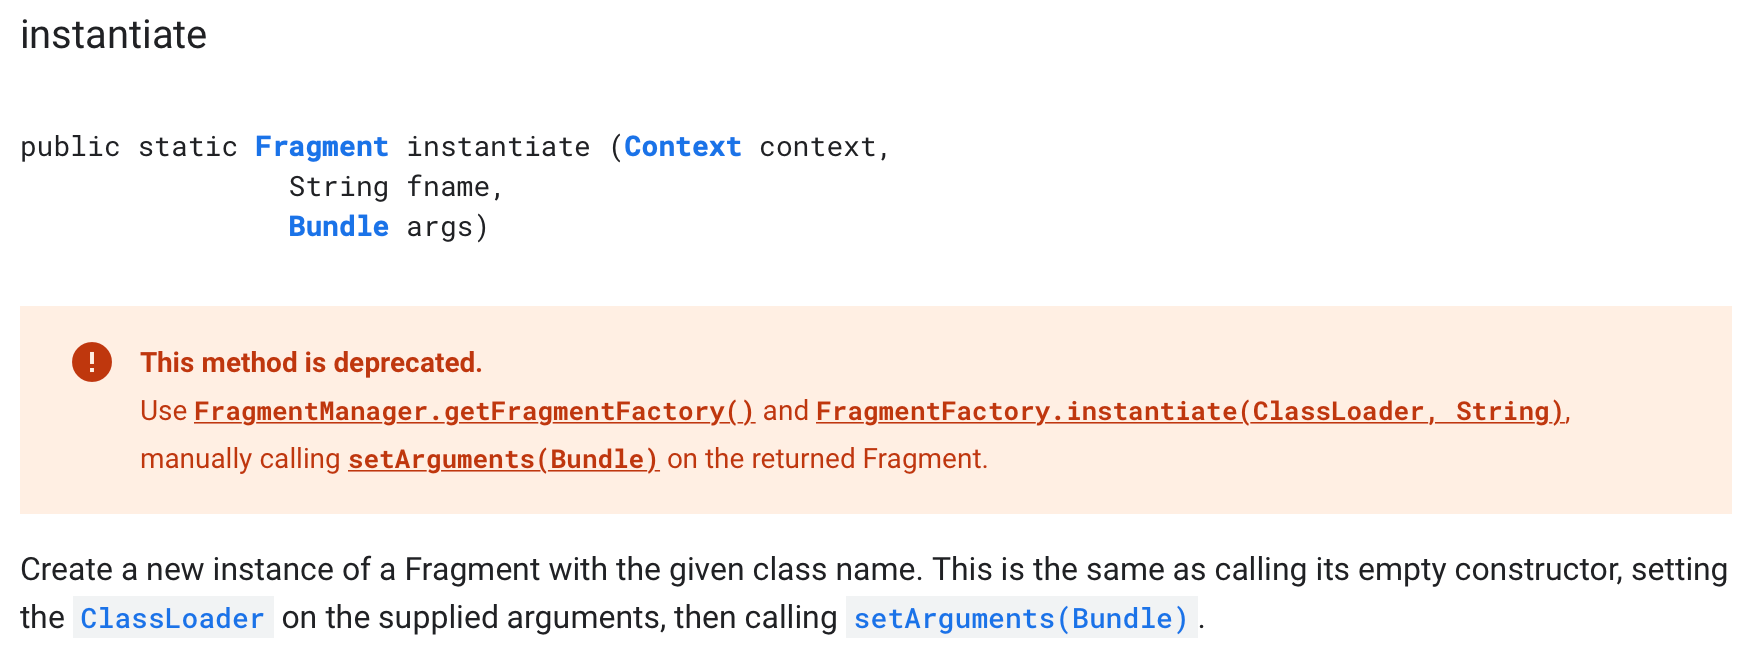
androidx.fragment.app 패키지의 Fragment 문서에서 instantiate()의 설명을 다시 찾아보면 deprecated 되었다는 것을 알 수 있다. Fragment의 instantiate 대신 FragmentFactory의 instantiate를 사용하라고 나와있다.

구현을 보면 양쪽 다 동일하게 Fragment 인스턴스를 반환하는 역할을 하고 있는데, 인스턴스가 재생성될 때 내부적으로 호출하는 코드를 커스텀할 수 있게 FragmentFactory로 떼어놓은 듯 하다.
사용하는 방법
생성자로 인자를 받는 Fragment를 만들어보자
class MyFragment(private val index: Int) : Fragment() {

    //...

}
FragmentFactory를 상속받은 후 클래스 이름에 따라 적절한 Fragment를 반환하도록 커스텀 해주자
class MyFragmentFactory(private val index: Int): FragmentFactory() {

    override fun instantiate(classLoader: ClassLoader, className: String): Fragment {
        return when (className) {
            MyFragment::class.java.name -> MyFragment(index)
            else -> super.instantiate(classLoader, className)
        }
    }
}
Activity에서는 다음과 같이 fragment를 생성할 수 있다.
    override fun onCreate(savedInstanceState: Bundle?) {
        supportFragmentManager.fragmentFactory = MyFragmentFactory()
        super.onCreate(savedInstanceState)
        binding = DataBindingUtil.setContentView(this, layoutId)

        val fragment = supportFragmentManager.fragmentFactory.instantiate(classLoader, MyFragment::class.java.name)
        supportFragmentManager.commit {
            add(containerId, fragment, MyFragment.TAG)
            addToBackStack(null)
        }
    }
이때 fragmentManager에 fragmentFactory 객체를 설정하는 부분은 반드시 lifecycle callback 중 super.OnCreate()보다 먼저 호출되어야 한다는 점을 유의하자.
이렇게 하면 빈 생성자 + Bundle을 사용하지 않아도 Fragment가 재생성될 때 인자로 넘긴 데이터가 유지된다!
- 물론 FragmentFactory를 사용하지 않고 이전에 사용하던 방식을 그대로 사용하더라도 앱을 만드는데 문제는 없다.
- 마찬가지로 Fragment에 전달할 데이터가 없어서 빈 생성자를 사용한다면 FragmentFactory를 커스텀할 필요는 없다.
- koin 같은 라이브러리를 함께 사용하면 이 fragmentFactory를 직접 구현하지 않고도 더 간편하게 의존성 주입 처리를 할 수 있다.
참고 자료
'if (study) > Android' 카테고리의 다른 글
| [Android] ListAdapter로 RecyclerView 효율적으로 사용하기 (DiffUtil, AsyncListDiffer) (4) | 2020.05.25 |
|---|---|
| [Andoird] DatePicker에서 선택 가능한 날짜 범위 정하기 (0) | 2020.04.22 |
| [Android/Kotlin] TimePicker에 시간 간격(Interval) 설정하기 (0) | 2020.04.21 |


