
[Android] 안드로이드의 레이아웃, LinearLayout 사용법 정리하기
레이아웃
안드로이드 앱 화면을 구성하는 요소들을 뷰(View)라고 칭한다. 버튼, 텍스트, 등등 여러개의 뷰는 각자 정해진 위치를 가지고 있다.
레이아웃(Layout)은 뷰의 배치 방식을 정의한 것이다. Layout 클래스는 View를 배치하는 역할을 가진 ViewGroup이라 할 수 있다. 안드로이드는 뷰를 배치하는데 있어 다양한 종류의 레이아웃을 제공하는데, 이번 글에서는 안드로이드의 대표적인 레이아웃인 LinearLayout에 대해 정리하려 한다.
LinearLayout (리니어 레이아웃)
LinearLayout은 뷰를 한쪽 방향으로 차곡차곡 쌓는다. 바닥에 박스를 차례대로 쌓는 상황을 생각하면 된다. 사용 방법도 간단하다. 한 방향으로 나열하고 싶은 View들을 하나의 LinearLayout 태그로 감싸기만 하면 된다.
뷰를 쌓는 방향 (orientation)
리니어 레이아웃은 뷰를 차례대로 추가하는 레이아웃이므로, 방향은 반드시 지정해야 하는 속성이다.
선택 가능한 방향은 위에서 아래(↓), 또는 왼쪽에서 오른쪽 방향(→)이다.
방향을 지정하는 속성은 android:orientation이다. vertical은 세로 방향, horizontal은 가로 방향으로 정렬시킨다.
세개의 버튼을 세로로 나열하는 코드는 다음과 같다.
<?xml version="1.0" encoding="utf-8"?>
<LinearLayout xmlns:android="http://schemas.android.com/apk/res/android"
    xmlns:tools="http://schemas.android.com/tools"
    android:layout_width="match_parent"
    android:layout_height="match_parent"
    android:orientation="vertical"
    tools:context=".MainActivity">

    <Button
        android:layout_width="wrap_content"
        android:layout_height="wrap_content"
        android:text="버튼1" />

    <Button
        android:layout_width="wrap_content"
        android:layout_height="wrap_content"
        android:text="버튼2" />

    <Button
        android:layout_width="wrap_content"
        android:layout_height="wrap_content"
        android:text="버튼3" />

</LinearLayout>
LinearLayout 태그로 감싼 3개의 버튼이 세로 방향으로 정렬된 것을 확인할 수 있다. (좌)
동일한 코드에서 vertical을 horizontal로 바꾸면 버튼은 가로로 배치된다. (우)


뷰의 정렬 방향 (gravity)
LinearLayout 안에 든 뷰는 방향을 지정하여 정렬할 수 있다. 뷰를 정렬할 때는 layout_gravity와 gravity 속성을 사용한다. 두개의 속성은 이름은 비슷하지만 서로 다른 역할을 한다. layout_gravity 속성은 뷰의 위치를, gravity는 뷰에 든 내용물들의 위치를 변경한다.
layout_gravity: 부모 컨테이너의 남은 영역 안에서 뷰를 정렬하는 데 사용한다.gravity: 뷰 내부의 내용물 정렬하는 데 사용한다.
예를들어, 버튼2의 layout_gravity가 end로 되어있다면 Button을 부모 컨테이너인 LinearLayout의 우쪽 방향으로 끌어당긴다.
<?xml version="1.0" encoding="utf-8"?>
<LinearLayout xmlns:android="http://schemas.android.com/apk/res/android"
    android:layout_width="match_parent"
    android:layout_height="wrap_content"
    android:background="@android:color/holo_blue_bright"
    android:orientation="vertical">

    <Button
        android:layout_width="wrap_content"
        android:layout_height="match_parent"
        android:text="버튼1" />

    <Button
        android:layout_width="wrap_content"
        android:layout_height="wrap_content"
        android:layout_gravity="end"
        android:text="버튼2" />

</LinearLayout>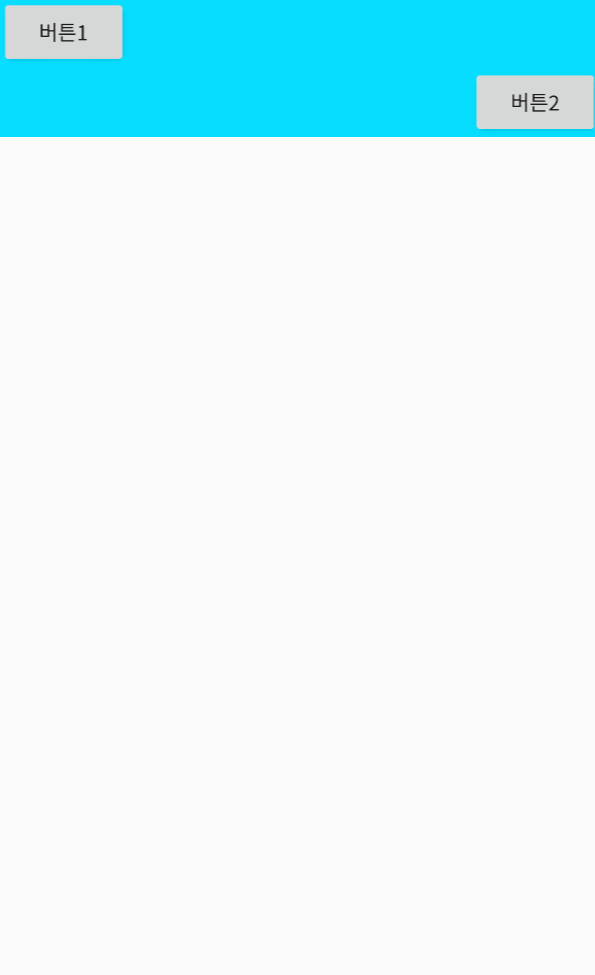
가로가 match_parent로 설정된 TextView의 gravity를 center으로 설정한다면 텍스트(내용물)은 View 내부의 여유공간 내에서 아래쪽으로 달라붙는다.
<?xml version="1.0" encoding="utf-8"?>
<LinearLayout xmlns:android="http://schemas.android.com/apk/res/android"
    android:layout_width="match_parent"
    android:layout_height="wrap_content"
    android:orientation="vertical">

    <TextView
        android:layout_width="match_parent"
        android:layout_height="wrap_content"
        android:background="@android:color/holo_green_light"
        android:gravity="center"
        android:text="텍스트뷰" />

</LinearLayout>
가로가 match_parent로 설정된 레이아웃 안에서 gravity를 end로 설정하면 아래와 같이 LinearLayout의 내용물인 버튼들이 우측으로 정렬된다.
<?xml version="1.0" encoding="utf-8"?>
<LinearLayout xmlns:android="http://schemas.android.com/apk/res/android"
    android:layout_width="match_parent"
    android:layout_height="wrap_content"
    android:gravity="end"
    android:orientation="vertical">

    <Button
        android:layout_width="wrap_content"
        android:layout_height="wrap_content"
        android:text="버튼1" />

    <Button
        android:layout_width="wrap_content"
        android:layout_height="wrap_content"
        android:text="버튼2" />

</LinearLayout>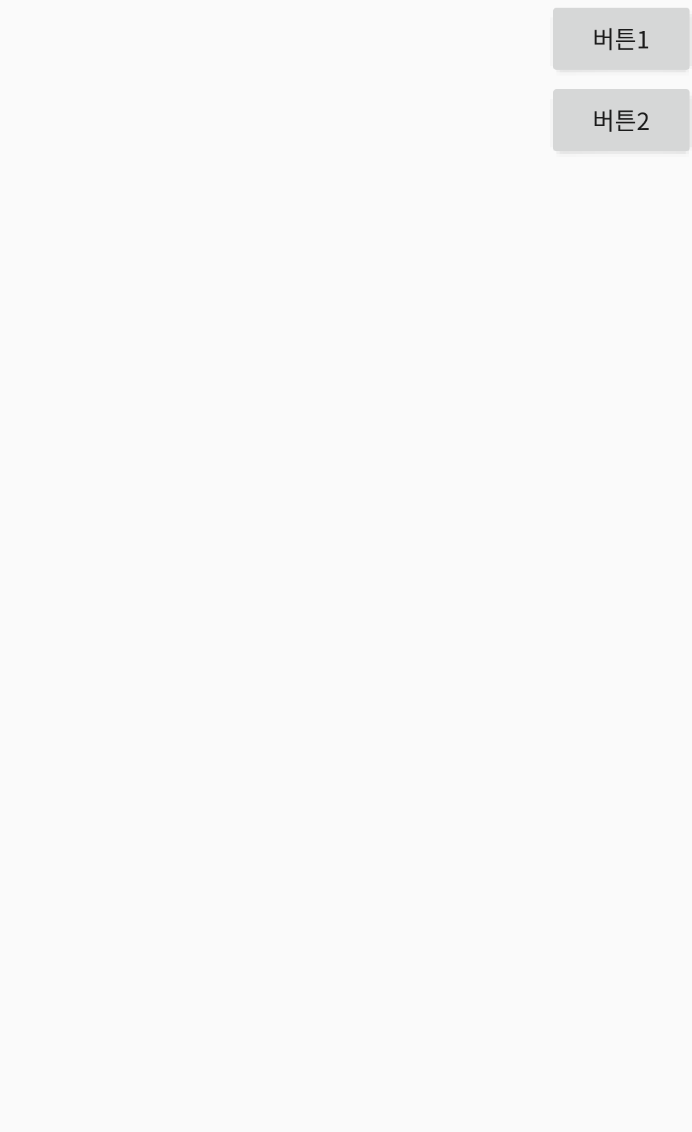
정렬 속성은 끌어 당기는 방향으로 여유 공간이 있을 경우에만 적용된다. 높이가 100인 LinearLayout 안에서 높이가 100인 TextView에 top이나 bottom으로 정렬을 적용한다면 여유 공간이 없으므로 움직이지 않을 것이다.
공간 분할 (weight)
여러개의 뷰를 특정한 비례에 맞춰 배치하고 싶을 때는 layout_weight 속성을 사용한다.
무조건 남아있는 여유 공간을 기준으로 공간을 분할하기 때문에, 이 속성을 사용할 때는 해당 방향의 길이를 0dp로 설정해야 한다. 예를들어 3개의 버튼을 동일한 크기로 가로 방향으로 배치한다면 layout_weight를 각각 1, layout_weight를 0dp로 설정한다.
<?xml version="1.0" encoding="utf-8"?>
<LinearLayout xmlns:android="http://schemas.android.com/apk/res/android"
    android:layout_width="match_parent"
    android:layout_height="wrap_content"
    android:orientation="horizontal">

    <Button
        android:layout_width="0dp"
        android:layout_height="wrap_content"
        android:layout_weight="1"
        android:text="버튼1" />

    <Button
        android:layout_width="0dp"
        android:layout_height="wrap_content"
        android:layout_weight="1"
        android:text="버튼2" />

    <Button
        android:layout_width="0dp"
        android:layout_height="wrap_content"
        android:layout_weight="2"
        android:text="버튼3" />

</LinearLayout>
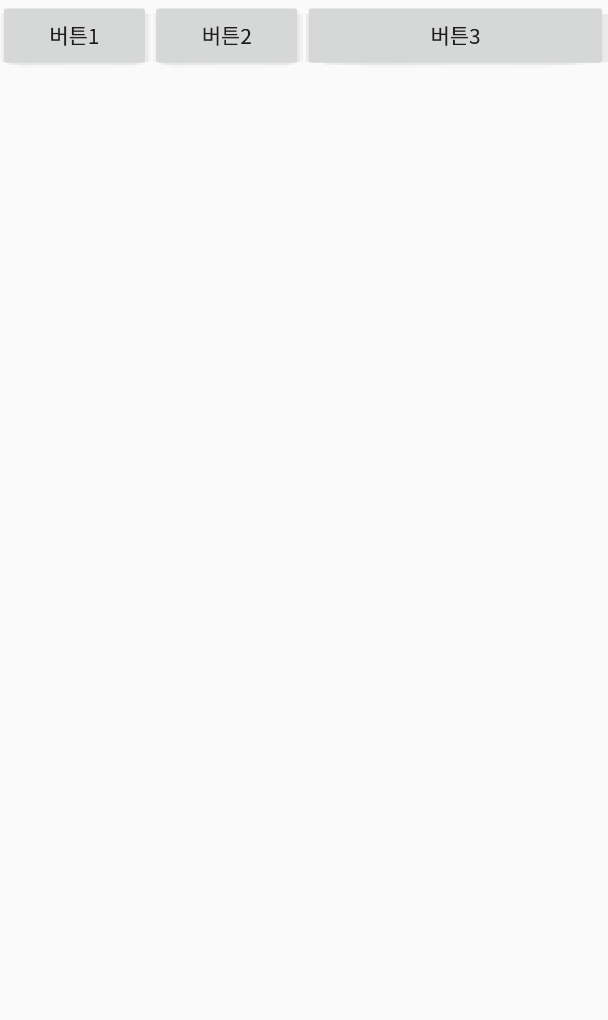
이런 식으로 layout_weight를 설정한다면 버튼1과 버튼2는 가로 영역의 1/4를, 버튼3은 가로 영역의 2/4를 차지하게 된다.
레이아웃의 크기 설정 (padding, margin)
뷰가 차지할 공간은 기본적으로 layout_width와 layout_height에 의해 결정된다.
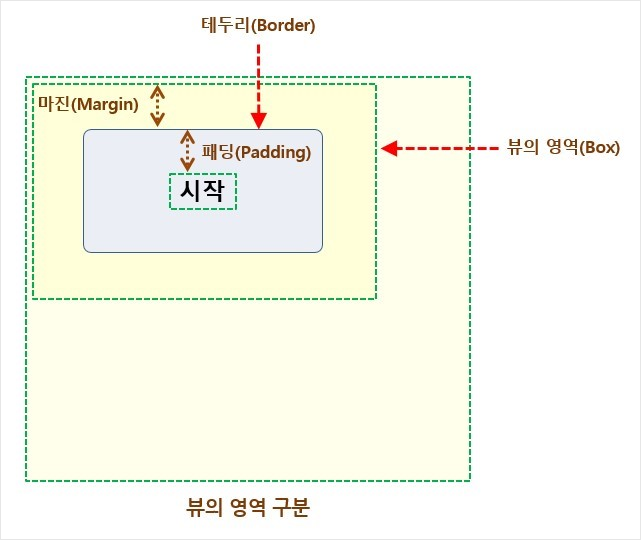
만약 뷰와 다른 뷰 사이에 여백을 두고싶다면 margin을 사용할 수 있다. margin은 뷰의 테두리선 바깥쪽 공간을 얼마나 띄울 것인지 지정한다.
뷰 내부에서 여유 공간을 두고 싶다면 padding을 사용한다. padding은 뷰 내부의 내용물과 뷰의 테두리를 얼마나 띄울 것인지 지정하는 속성이다. margin과 padding은 LinearLayout이 아닌 다른 레이아웃에서도 공통으로 사용할 수 있는 속성이다.
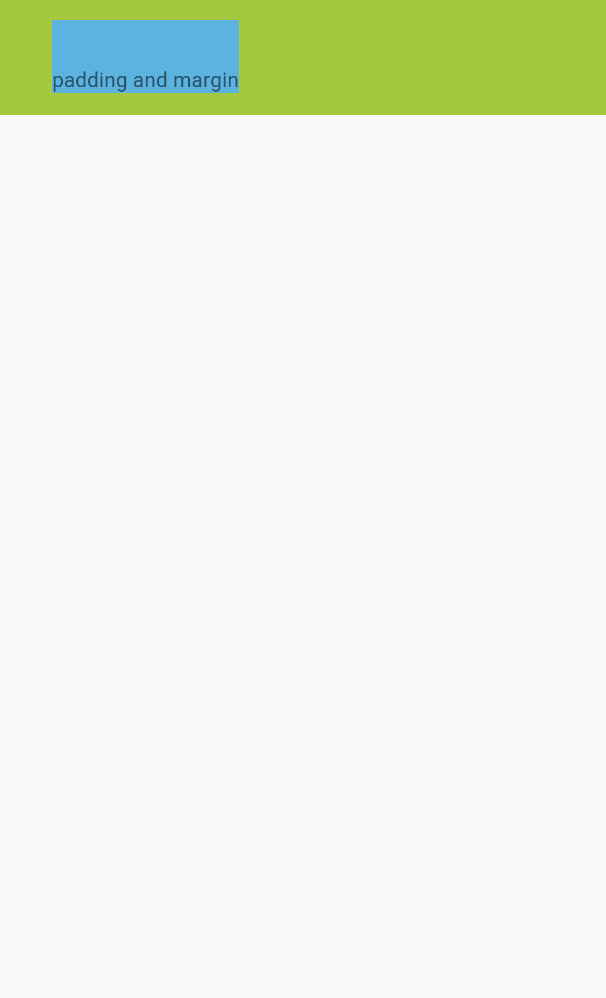
<?xml version="1.0" encoding="utf-8"?>
<LinearLayout xmlns:android="http://schemas.android.com/apk/res/android"
    android:layout_width="match_parent"
    android:layout_height="wrap_content"
    android:background="@android:color/holo_green_light"
    android:orientation="horizontal"
    android:padding="15dp">

    <TextView
        android:layout_width="wrap_content"
        android:layout_height="wrap_content"
        android:layout_marginStart="20dp"
        android:background="@android:color/holo_blue_light"
        android:paddingTop="30dp"
        android:text="padding and margin" />

</LinearLayout>
LinearLayout 내부 상하좌우에 padding을 15,TextView 내부 상단에 padding을 30, 좌측에 margin을 20 부여한 모습이다.
요약
- 레이아웃은 ViewGroup을 상속받으므로 하나의 View처럼 다룰 수 있다. 필요에 따라 다양한 종류의 레이아웃을 중첩해서 사용할 수 있으며, 만들어야하는 화면에 따라 적합한 방식을 선택하면 된다.
- LinearLayout : 한쪽 방향으로 차례대로 뷰를 추가하여 화면을 구성한다. 사용시 뷰가 쌓이는 방향을 반드시 지정해야 한다.
'if (study) > Android' 카테고리의 다른 글
| [Android] 안드로이드의 이벤트 처리 (0) | 2019.08.28 |
|---|---|
| [Android] TableLayout(테이블 레이아웃) 사용하기 (0) | 2019.08.22 |
| [Android] 뷰(View)와 XML 레이아웃의 기본 구조 (0) | 2019.08.15 |