[스프링 부트 개념과 활용] 스프링 부트 시작하기
인프런에서 백기선님의 스프링 부트 개념과 활용을 수강하고 개인적으로 공부한 내용을 정리한 글입니다.
스프링 부트 소개
- 스프링 부트는 프로덕션 수준의 스프링 기반 어플리케이션을 쉽게 만들 수 있게 해준다.
- 스프링 플랫폼 뿐만 아니라 서드파티 라이브러리(ex. tomcat)에 대한 설정을 기본적으로 제공해준다.
- 스프링 개발을 할 때 더 빠르고 폭넓은 사용성을 제공한다. 일일이 설정하지 않아도 컨벤션으로 정해진 설정을 제공해준다. 개발자가 원한다면 이런 설정을 쉽고 빠르게 바꿀 수 있다.
- xml 설정과 code generation을 더 이상 하지 않는다.
스프링 부트 프로젝트 만들기
준비물
- Java 8 이상
- 스프링 5.0 이상
- maven 3.2+, gradle 4
Maven 프로젝트 설정
Intellij 에서 새로운 maven 프로젝트를 만들고, pom.xml에 부모 프로젝트 설정을 한다. Spring 레퍼런스에서 제공해주는 pom.xml 템플릿을 복사-붙여넣기 해주자.
IDE 우측 하단에서 auto-import를 활성화 해주면 알아서 import가 된다.
<?xml version="1.0" encoding="UTF-8"?>
<project xmlns="http://maven.apache.org/POM/4.0.0" xmlns:xsi="http://www.w3.org/2001/XMLSchema-instance"
    xsi:schemaLocation="http://maven.apache.org/POM/4.0.0 http://maven.apache.org/xsd/maven-4.0.0.xsd">
    <modelVersion>4.0.0</modelVersion>

    <groupId>com.example</groupId>
    <artifactId>myproject</artifactId>
    <version>0.0.1-SNAPSHOT</version>

    <!-- Inherit defaults from Spring Boot -->
    <parent>
        <groupId>org.springframework.boot</groupId>
        <artifactId>spring-boot-starter-parent</artifactId>
        <version>2.0.3.RELEASE</version>
    </parent>

    <!-- Add typical dependencies for a web application -->
    <dependencies>
        <dependency>
            <groupId>org.springframework.boot</groupId>
            <artifactId>spring-boot-starter-web</artifactId>
        </dependency>
    </dependencies>

    <!-- Package as an executable jar -->
    <build>
        <plugins>
            <plugin>
                <groupId>org.springframework.boot</groupId>
                <artifactId>spring-boot-maven-plugin</artifactId>
            </plugin>
        </plugins>
    </build>

</project>
패키지를 하나 만들고, 그 안에 자바 파일을 만들어주자.
@SpringBootApplication
public class Application {

    public static void main(String[] args) {
        SpringApplication.run(Application.class, args);
    }
}
여기까지가 스프링 부트 기본 프로젝트 생성 방법이다.
실행해보면 Tomcat started on port(s): 8080 (http) with context path ''라는 로그가 나타나고, localhost로 들어가면 에러가 뜨지만 서버가 돌아가고 있다는 것을 알 수 있다.
스프링 프로젝트의 구조
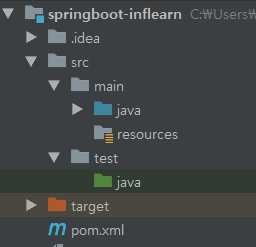
maven 기본 프로젝트 구조와 동일하다.
- 소스 코드 (src\main\java)
- 소스 리소스 (src\main\resource)
- 테스트 코드 (src\test\java)
- 테스트 리소스 (src\test\resource)

메인 어플리케이션
Application 클래스는 스프링 프로젝트가 시작되는 위치로, 클래스에 @SpringBootApplication 어노테이션을 붙이고 main 함수를 포함하고 있어야 한다.
package com.example.myapplication;

import org.springframework.boot.SpringApplication;
import org.springframework.boot.autoconfigure.SpringBootApplication;

@SpringBootApplication
public class Application {

    public static void main(String[] args) {
        SpringApplication.run(Application.class, args);
    }

}
Spring에서 권장하는 메인 애플리케이션의 위치
- src\main\java 하위의 최상위 패키지(root)에 위치시키기
- Component Scanning이 시작되는 지점이기 때문이다.
- 모든 패키지를 스캔할 필요는 없기 때문에, 디폴트 패키지를 하나 만들어 두는게 좋다.
com
 +- example
     +- myapplication
         +- Application.java (@SpringBootApplication를 사용하는 어플리케이션 클래스)
         |
         +- customer
         |   +- Customer.java
         |   +- CustomerController.java
         |   +- CustomerService.java
         |   +- CustomerRepository.java
         |
         +- order
             +- Order.java
             +- OrderController.java
             +- OrderService.java
             +- OrderRepository.java
Reference
https://docs.spring.io/spring-boot/docs/2.0.3.RELEASE/reference/htmlsingle/#boot-documentation-about
Spring Boot Reference Guide
This section dives into the details of Spring Boot. Here you can learn about the key features that you may want to use and customize. If you have not already done so, you might want to read the "Part II, “Getting Started”" and "Part III, “Using Spr
docs.spring.io
'if (study) > Spring' 카테고리의 다른 글
| [스프링 부트 개념과 활용] 자동 설정 (Auto Configuration) (0) | 2020.07.20 |
|---|---|
| [스프링 부트 개념과 활용] 의존성 관리 (dependency management) (0) | 2020.07.20 |
| [예제로 배우는 스프링 입문] Spring IoC, AOP, PSA (0) | 2020.07.20 |


